
Bringing the Outdoors In: What You Need to Know Before Working with Live-Edge Slabs
Bringing the Outdoors In: What You Need to Know Before Working with Live-Edge Slabs
Live-edge wood slabs, with their natural organic contours, can transform a piece of furniture from ordinary to extraordinary. But before you start dreaming of that stunning river table or coffee table, there are a few important things every crafter and DIYer should know. Working with live-edge isn't the same as working with dimensional lumber. It requires a deeper understanding of the wood itself to ensure your finished project lasts a lifetime.
1. First things First! Source your slab wisely
Your project's success begins with selecting the right slab. Look for a reputable supplier who offers well-dried wood.
Kiln-dried is king: This is your best bet for stability. Kiln drying brings the wood's moisture content down to a stable level (ideally 6–12%) and helps eliminate any pests living inside
Species matters: Different types of wood have different properties. Black walnut is a classic for its rich color and grain, while oak is known for its durability. Consider the color, grain, and durability when making your choice.
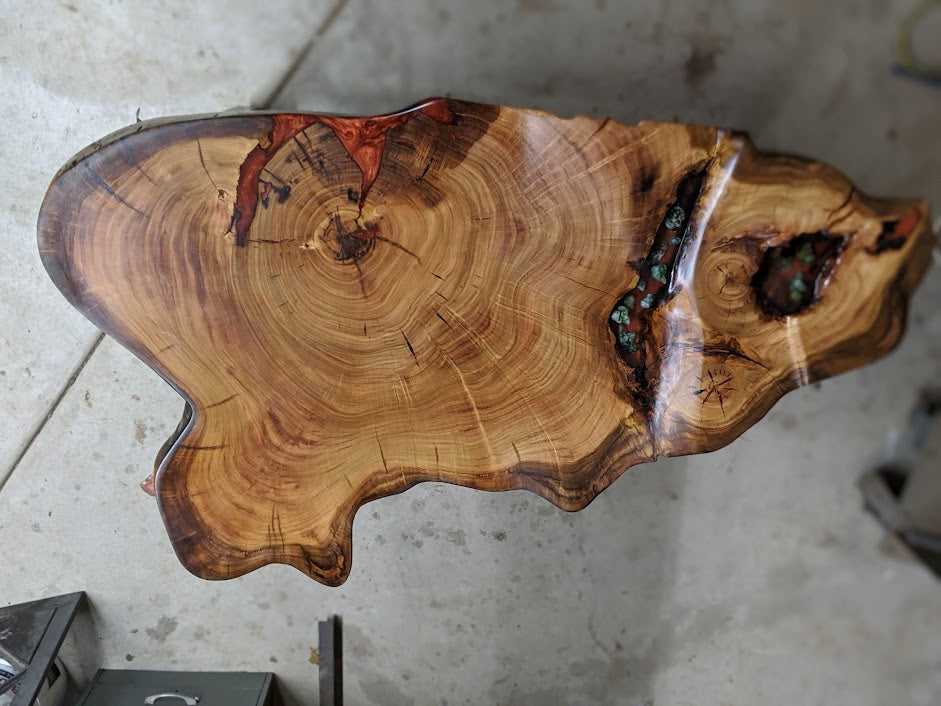
Embrace imperfections: Live-edge is all about character. Look for interesting knots, cracks, and voids, as these are opportunities for stunning epoxy fills or butterfly joints. Avoid slabs with severe warping or rot, which can cause structural problems.
2. Take drying time and acclimation seriously
Ignoring this step is the fastest way to a warped or cracked project. Wood expands and contracts with changes in temperature and humidity, so your slab needs to adjust to its new home.
Acclimate your slab: After purchasing, bring the slab into the environment where it will live. Let it sit for a few weeks to adjust to the specific humidity levels of your workshop or home.\
Monitor moisture levels: For serious projects, a moisture meter is a wise investment. Ensure your slab is at the right moisture content before you begin cutting and finishing.
There are two different sources for moisture in wood. One I like to call green moisture. This is the moisture that came from the tree being alive and it is the moisture that takes the longest to evaporate from the wood.
The second type is any other moisture or water that entered the wood after it was cut down. In most cases this is rain water but it could also be something like wine in a wine barrel. Both will make the moisture content of the wood far too high to begin your project. The good news is that these moisture sources take much less time to evaporate than the moisture from green wood.
How Long it takes moisture to evaporate depends on a lot of factors from species, type of moisture, humidity, and heat, and air flow. A general rule of thumb when working with live edge slabs is that a slab will take 2-3 years / inch of thickness. Therefore, if you have a slab that is 2” think, it could take anywhere from 4-6 years of air drying before you can work with it. These times can be sped up and turned into a matter of hours when kiln dried. (Keep in mind that your wood may have been kiln dried and then got wet from a water source. In this case you may be able to air dry for a short period of time and monitor the levels with a moisture reader.
Ok, so big deal if it isn't bellow 12% moisture content. Sure if you don't mind your project taking the shape of a potato chip due to warpage. Or equally as frustrating, having your finish become cloudy and yellow from condensation building up under it from the moisture you trapped in with your topcoat. The end result in this is cracked topcoat and having to strip it all off and refinish once the moisture content is low enough.
Don't lay a large slab flat on the floor. Proper storage involves stacking slabs with spacers between them to allow for even airflow.

3. Preparation is key to a beautiful finish
The true beauty of a live-edge slab is revealed through careful preparation.
Flatten the slab: Before you can sand, the slab needs to be flat. A router sled is a common DIY method for larger slabs, though woodshops may use a wide-belt sander or CNC machine.
Remove the bark (or don't): Decide whether to keep the bark on or remove it. If the bark is loose, it must go. Removing it with a chisel and wire brush will give you a smoother, cleaner look.
Fill imperfections: Use epoxy resin to fill knots, voids, and cracks. Colored epoxy can create a striking contrast, while clear epoxy will keep the look natural. Always use painter's tape on the underside of cracks to prevent leaks.
4. Choose your finish wisely
The right finish protects your slab and enhances its natural character.
Oils and waxes: For a matte, natural feel, choose a finish like tung oil or Rubio Monocoat. These penetrate the wood and make maintenance simple.
Epoxy for a show stopping surface: For a modern, high-gloss, and exceptionally durable finish, a pour-on epoxy resin is an excellent choice. It creates a thick, waterproof, and scratch-resistant coating that gives the wood a "wet look". It is especially effective for river tables or for fully encapsulating the live edge. Stone Coat Countertop Epoxy makes some great products for this option.
Application: For a clear coating, you will first need to seal the wood with a thin coat of epoxy to prevent air bubbles (outgassing) from escaping and creating imperfections in the final layer. Once the seal coat has cured, you can apply a thicker flood coat. For river tables, carefully tape the bottom of the slab to contain the pour.
Pro tip: A propane torch or heat gun can be used to pop any bubbles that rise to the surface of the wet epoxy.
By paying careful attention to these key steps, you can create a one-of-a-kind live-edge masterpiece that adds natural beauty and warmth to any space.
As always,
#livethedream #yourdreamdelivered